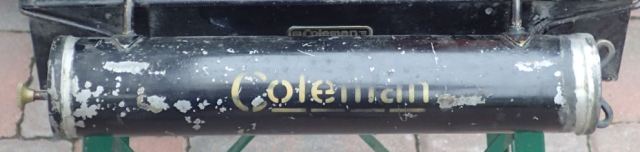
Here’s my Model 2 stove fount before I began to restore it
In a previous post I described the repair I performed on my 1925 Coleman Model 2, two-burner stove fount (fuel tank). Once repairs were complete and I tested the stove to ensure I had resolved all of the leaks, I needed to take the next step which is to repaint the fount gloss black and add the gold Coleman lettering. I hated to say goodbye to the nearly 95 year-old letters but the fount needed paint and there wasn’t a good way to save it. So, prior to working on it several months ago, I made a trace of the original letters using a black marker and some clear acetate film (from Lisa’s card making supplies) to ensure I had a good record of the original font. I searched and searched for an already made font which matched the original font but couldn’t find one in either letter shape or style, so tracing was the best option. I also took some measurements of the location and some close-up photos.

This is the scanned version of my trace before editing
After I traced the letters on the acetate, I scanned the film and opened the scan in a program such as Paint. Then I spent a couple of evenings editing the trace until I cleaned up all of the edges and added in parts of the letters which were missing.

Here is my trace after editing
To assist with the editing I used my close-up photos from my camera and a magnifying glass to look at the remaining letters on the fount to get the letters as accurate as possible.
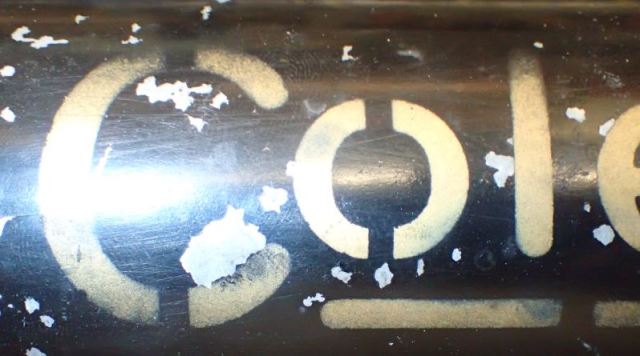
Take photos of the letters like this, or even closer, if possible
After that, I turned it over to my wife who is familiar with the vinyl cutting machine available at our local library, and she cut me a vinyl adhesive-backed stencil.
With that step completed, I felt confident that I could proceed with stripping all of the old paint from the fount, except . . . I needed to do one more thing. I needed to know where the letters were on the fount. I measured from the end of the fount to the first letter “C”, and also the “o” (the left edge of the “o” is 5-3/4″ from the left edge of the fount) and then noted that if the fount was sitting on a flat surface with the hinges also resting flat on the table, the letters were centered, sort of TDC, that is, top-dead-center (see photo).

Model 2 label alignment
Next, I used some painter’s masking tape placed on the surface of the fount and made some pencil marks so I could practice getting the stencil in the correct place. To do this I laid the fount flat on my bench and then used a woodworking combination square set on the bench and over the fount where I placed the tape. Looking down the fount towards the square I could see where the square touched the fount . . . TDC. During this practice session, I also learned that the paint was so fragile that even painter’s tape was removing the old, original paint. Yikes!

Practice the alignment first to help it go smoothly later
Now, I somewhat reluctantly removed all of the old paint and letters through light sanding with 220 grit sand paper and a wire brush. After cleaning 3 times with acetone, to remove any oil or other contaminants, I masked the fittings and hung it up at a good height for painting.

Mode 2 fount ready for paint
Painting it gloss black wasn’t as easy as I thought it would be. The propellant from the paint caused the tank to spin which made it difficult to keep track of what was already painted and gloss black is really shiny, so it was difficult to determine if everything was covered (I missed a few spots on the first coat and even a little on the second coat). Eventually, I covered it all with three coats and it came out nice.

Model 2 fount with fresh paint, and my Model 400 on the floor for tea.
After three days of drying I added my tape and aligned the stencil, just as I had practiced. This went smoothly and I’m glad I practiced first.

The stencil is aligned and attached
Then, I masked the rest of the fount and sprayed it gold. Again, I needed three coats to cover over the black paint. BTW – I used Rust-Oleum Pure Gold Metallic paint for the letters. To find a good match, I took my original letter photos to the store and compared the photos to the paint caps until I found a good match.

This was after two coats. I added one more to cover the black paint
I let this dry for only 30 minutes before removing the mask and stencil because I didn’t want the paint to dry too much and make the stencil difficult to remove from the gold paint. I was also worried that the tape or stencil might pull off the black paint.
Lisa and I rather nervously removed everything and the result was quite a pleasant surprise (or, relief!).

Model 2 Coleman text restored
It is tempting to wet-sand the whole fount and buff it to see if I could make it as smooth as it would have been originally, but for now, I think I’ll use it just like this, because I can’t wait to get this back onto the stove and into operation again!
Also, if you’ve got a Model 2 and need to see the generator internal parts, check out my post on the generator tear-down and clean-up .
Thanks for visiting my blog.

You must be logged in to post a comment.