
Coleman backpacking lanterns. Being a backpacker and a little wary of packing anything I think I don’t need I’ve haven’t thought too much about these little appliances. I bought that Coleman 222A Peak 1 lantern a while back and it complemented my Peak 1 400A stove so I thought it was a nice addition. Some months later I spotted a similar design lantern by Coleman designated 229 locally and had my son pick it up for me. Then, I found another one and finally this 226 at a local pawn shop. These little lanterns are small, bright and easy to work on . . . once I figured it out.

The 226 uses a #20 mantle
The 226 is cosmetically different than the 222 series (No letter, A, B) and the 229 and the 3022 lanterns in that the vent is a different shape and the lantern has a collar between the burner frame and the fount. It is also a dual fuel lantern and this one was run with RUG (Regular Unleaded Gasoline). When I got it home I washed off what appeared to be old bacon grease on the vent and on the globe, then added a #20 mantle, and gave it a go, checking for leaks. It wouldn’t light at all, but I could hear air, so my thinking went to a clogged fuel tip. Well, it is over 20 years old and these backpacking lanterns use O-ring seals instead of graphite packings so time to tear it down, I think. For comparison, please check out my blog post on the 222A lantern.
A word of caution and a note. First, if you plan to disassemble your lantern you do so at your own risk. Second, you will see that the seals are O-rings of a specific size and material. Substitutions with other sizes or materials may result in hazardous or dangerous operating conditions.

I use a strap wrench to hold the fount and an adjustable wrench to grip the valve body
You only need a couple of standard wrenches to get the fittings on this lantern apart; One is 1/2” or 13mm which is for the generator jamb nut, and the other is 7/16” or 11mm which is used to remove the bolt that holds the burner frame to the fount. I used my typical setup of a large adjustable wrench (at one time called a Crescent wrench) and the strap wrench placed at the bottom edge of the fount, to remove the valve assembly.
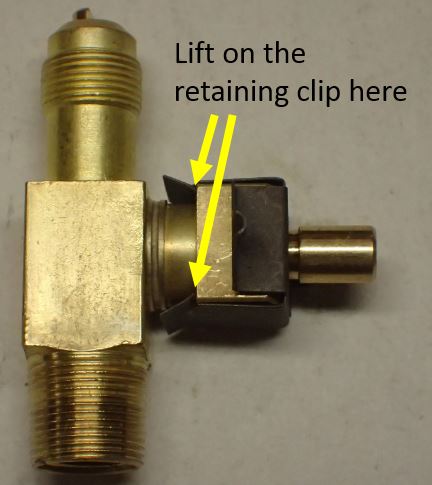
At this point it’ll be easy to see that the metal clip retains the valve stem. Carefully expand the metal clip at the back side until it is free, at which point it can be removed by hand. It does not require a lot of force. Once removed, the valve stem can be removed from the valve body by pulling it out.

O-ring size and material for this 226 lantern
Next, using a pair of pliers and a piece of leather or bicycle rubber inner tube un-thread the F/A tube (Fuel/Air) from the valve body. The leather or rubber is meant to prevent the gripping tool from digging into the brass. It shouldn’t be too difficult to remove as there was no sealant on the thread and the fitting was also sealed with an O-ring. Note: Originally, I thought this seal was a flat gasket, but I compared it to a new Coleman 290 plastic F/A tube gasket and it was not flat. It is an O-ring.
If you have new O-rings then remove the old O-rings and clean the parts, especially the F/A tube. Unlike F/A tube designs with a metering rod, this design does not use one, so dried fuel may clog the fuel opening at the bottom of the tube.
For reference, here are the parts you will need:
Qty: 1, 1×8 Viton O-ring (this is 1mm width with an 8mm I.D. or Inside Diameter)
Qty: 1, #005 Fluorosilicone O-ring (this blue O-ring has better cold temperature performance than Viton)
Qty: 1, #009 Fluorosilicone O-ring (mine was closer to the eccentric block)
Qty:1, #009 Viton O-ring (these are less expensive than Fluorosilicone)

I bought my O-rings online at McMaster-Carr. Unfortunately, you cannot purchase just one or two of each, so I ended up with 25 of each, but since I use some of these on other GPAs I already had some of them in my parts kit. As noted earlier, the materials used in these O-rings are fuel-resistant and rated for high temperatures, whereas the ones you might purchase at your local hardware store may only be suitable for water and lower temperatures. Using the wrong O-ring could cause a leak once the lantern reaches temperature and the pressures associated with heated gasses. Even with properly rated O-rings they can wear down over time developing flat spots and I’ve had some of the O-rings fail on one of my 442 stoves and my 222A lantern.

226 lantern valve assembly
I reassembled the valve to make sure everything fit correctly but it does take a bit of patience as it takes a minute or two to get the valve stem properly aligned to the eccentric block. Be sure it is inserted all the way and the retaining clip looks just like it did before you removed it. Next, I removed the generator and the knob again and using a little Permatex Aircraft sealant on the fount threads re-installed the valve to the proper clocking position. Well, I got it close, but I test fit the collar and adjusted it just a little.

Don’t forget the attach the tip cleaner hook to the eccentric block
At this point the collar will need to be installed before installing the generator. It takes a few seconds to figure out how to get it around the valve stem, but it works. When installing the generator don’t forget to depressurize the tank (open the fuel cap), to prevent spraying yourself with fuel, and move the valve to the up/clean position and hook the generator’s tip cleaner to the eccentric block (this is the piece with the hole in it sticking out of the top of the valve).

If you don’t get the collar positioned correctly, the collar may get bent when installing the bolt
When installing the bolt, you’ll want to ensure that the three tabs on the burner frame sit inside the collar for proper alignment.

I used some needle-nose pliers to twist the pump cap
Before I went any further, I decided that it would be good to examine the pump cup. Typically, these are neoprene and can crack over time. So, why not take a look now? Using a pair of needle nose pliers I inserted the tips into the pump cap notches and rotated counter-clock wise. I removed the pump, inspected it, added a little oil and reinstalled it. All was good.

I followed the lighting instruction on the lantern. It lit, but then went out right away. I tried this many times but eventually I swapped out the generator and that seems to have fixed this issue. Upon closer inspection it appears that the tip cleaner wire may have worn down or broke off and wasn’t cleaning the tip. So, initially, it appears that the F/A tube was clogged, but also the generator tip cleaner may also have been damaged.
My lantern is a 226-700 and uses a 226-2991 generator and a #20 mantle. The #20 mantle is a bit smaller than the typical Coleman mantle designated #21A and used on other larger single-mantle and dual-mantle lanterns. If I find a good way to get the generator apart for cleaning I’ll add that to this post later.

A thorough clean-up and a new generator and it looks good
Well . . . so far, so good. I’ll keep testing and see how it goes,
Thanks for visiting my blog.

[…] tear-down is similar to the 222 lantern and the 222A and also the 226 lantern. Go to the links provided for more reference if needed. They all use similar Fluorosilicone and […]
LikeLike
[…] seems like the early models, such as the 222, 222A and 222B came with the clear globes and then the 226, 229 and 3022 came with some sort of pattern. They also seem to be dated with month and […]
LikeLike
Crazy thing is I’m cleaning up one of these right now and the valve stem in mine only had one o-ring and not the double o-ring setup like yours. Other than that the valve assembly is identical though.
LikeLike
Someone on the Coleman Collector’s Forum mentioned that recently, too. Cost saving measure by Coleman?
LikeLike