I mentioned some weeks ago that I may have a new hobby. What began as a curiosity based on some old military stoves my father owned when I was a kid has turned into regular searches on ebay for trashed-out stoves and lanterns and many evenings tinkering with my purchases in the garage. But, if I’m not building boats at the moment this seems like an interesting thing to do.

The Prentiss Waber M-1942-MOD “Mountain” Stove
A month ago I purchased two Prentiss Wabers M-1942-MOD(ified) “Mountain” Stoves. Both are dated, PW-1-45 (PW = Prentiss Wabers). These stoves were made collectively, I believe, by Coleman, Prentiss Wabers (a.k.a Preway) and Aladdin. When I received the first one, I was working on two other stoves, so I didn’t take a close look at it, but by the time I received the second one, and compared the two, it was obvious that someone had tinkered with it before. So, I completely disassembled it. In my opinion, as long as you don’t break anything, this is a good way to learn about its operation and helps identify where things can go wrong. I’ve always enjoyed this. One time, back in my early twenties, I bought a two-cylinder, two-cycle, model airplane engine just so I could take it apart to see first-hand how the fuel delivery worked with only one carburetor, and no poppet valves, etc. That was pretty neat. Anyway, I disassembled the stove and got to work on cleaning it up.
Update for July 2017:
For some history about this stove, see my blog entry, The Mountain Stove
For a description of the features of this stove, see my blog entry, Buying an M-1942 Stove
For a description of fettling this stove, see my blog entry, Minimal Effort to Blue Flame
This blog post updated 27 November 2016 and 22 July 2019
For information about interchangeability of burner bowls, vaporizers and tip cleaners, please see my blog post on M1942 Vaporizers.
Valve Removal (Added 22JUL2019)
The M-1942 MOD stove is not an instant lighting stove, so it isn’t typically necessary to remove the valve from the tank (a.k.a fount). It merely has a straight brass tube below the valve in the fount. However, most of the time I remove them anyway because I’m cleaning them up due to a lot of dirt (and sometimes gravel) in the fount or the fuel tube is clogged, etc. I’ve removed the valve on approximately 15, M-1942 MOD stoves.
Warning: One guy emailed me looking for a new valve assembly because he broke his valve body while attempting to disassemble his stove. Proceed with caution! I’m explaining what I do to remove the valve, however, you must use your own judgement and if you are uncertain of anything, please ask more questions. Old stoves are in all states of disrepair (or someone else’s repair) and I cannot be responsible for damage to your old stove.
There is a lock ring at the base of the valve assembly. It has a series of notches in it. This must be loosened before attempting to remove the valve. Using a punch and a hammer, strike the ring in one the notches to rotate it counter-clockwise. This will eliminate the friction between the pot-support/windscreen and the valve.

M-1942 MOD valve. Note the slotted lock ring at the bottom
Next, remove the valve stem. I do this by removing the valve wheel (plastic knob), and then the 9/16″ packing nut. Using the valve knob, I open the valve all the way and keep going to a point where the valve stem still turns but it doesn’t come out any further. If necessary, I re-install the screw to hold the knob in place and pull out the valve stem. Be careful not to break the valve stem.
Next, I re-install the 9/16″ packing nut. I do this to give more strength to the valve (for the next step) and to reduce the chance of damaging the threads during valve removal.
Finally, I use a 9/16″ deep-well mechanics socket and an extension and slip the socket over the 9/16″ valve stem packing nut so that it touches the main body of the valve. Do not use a standard shallow socket. I think this is how that one guy’s valve was broken. I think you can use a larger socket, inch or mm (15mm seems about right). Then, using a strap wrench around the base of the fount rotate the socket/extension counter-clockwise to remove the valve (see photo). If you have questions, please ask.

These are the tools I’ve used to remove the M-1942 MOD valve from the fount
Identification (Added 27NOV16)
Sometimes I ask ebay sellers for the year or manufacturer of a stove they’re selling and they reply that there isn’t one on the stove. Though Aladdin’s stamping is generally lighter that the others, I haven’t see one yet that doesn’t have it. These are all on the windscreen/pot support.

Identifying an M1942-MOD, Aladdin, Prentiss Wabers, Coleman
Another identification feature is the fold-out feet. Each manufacturer made the feet slightly different. I bought a pair of stoves where someone swapped out the parts, but since the manufacturer is stamped in the windscreen/pot support and not in the frame I looked at lots of photos online to get the proper tank with the other parts.
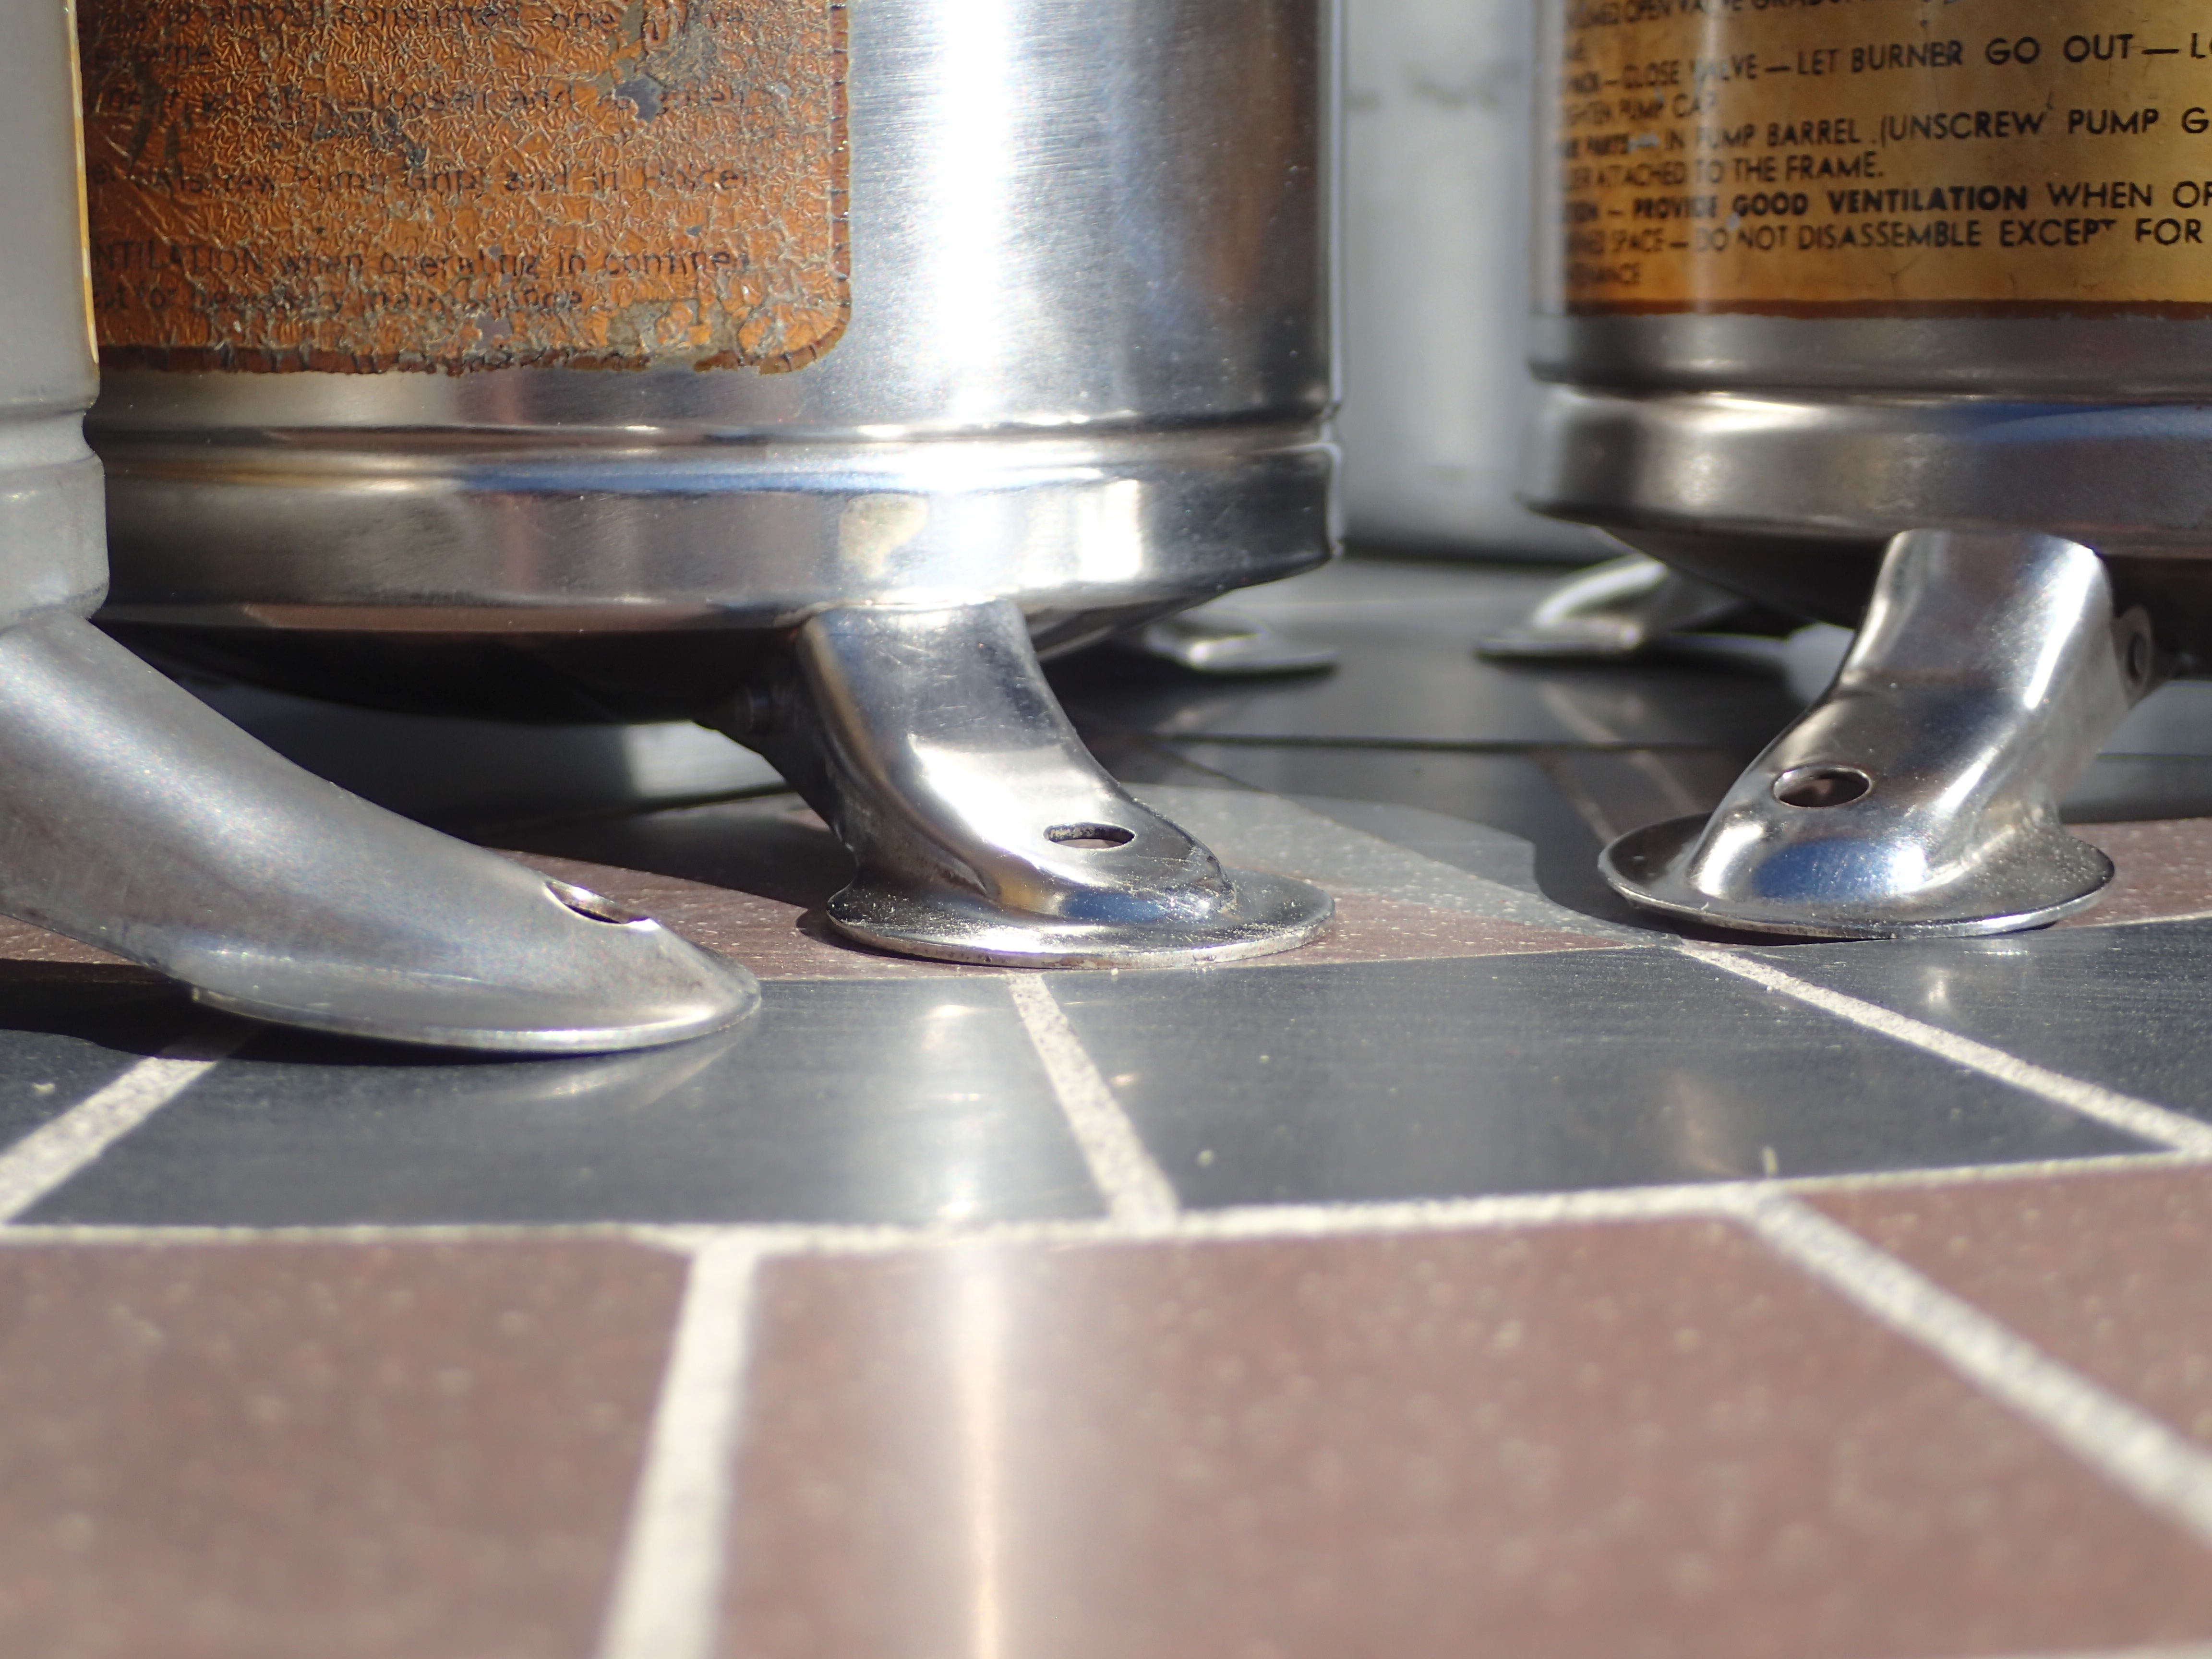
M-1942-MOD feet; Aladdin (l), Coleman (m), Prentiss Wabers (r)
Pumps
First, the pump. The pumps on these stoves are different than most other gas type stoves in that check valve (a.k.a. NRV) is built into the end to the removable pump tube, which also happens to be the same place you fill the tank with fuel. There are two styles of the NRV, which I didn’t know at the time. My first thought upon noticing this was that someone put in a homemade version of their own. But, I searched around the web and saw both styles on various forums. These little valves can be problematic if you don’t replace the rubber insert, as it dries out over time and allows fuel to back-up into the pump. Some people reported their stove catching fire because of this so I was certain to replace it right away. Another curious feature is that the pump itself is a storage tube for spare parts.
Addded 27NOV2016 – With more experience I know now that the two NRVs in the photo below are the M-1942 style (upper) and the M-1950 style (lower). I’ve been using both, so if you cannot find a suitable replacement spring for the M-1942 type, you can substitute an M-1950 spring/cup/gasket successfully. See my blog post on M1942 and M1950 NRV gaskets for more information.

The M1942 Pump. Note the Hollow Tube Can Hold Spare Parts

The Two Styles of M-1942-MOD NRV
Pump Tube Tolerances (Added 22JAN2022)
Recently, I was involved in a discussion on the Coleman Collectors Forum in which one member stated that not all of the pumps fit in any stove. I did some measurements and discovered that the tolerances can be very tight and that some pumps may not fit in some stoves. Below is a table of pump tube diameters and pump tube/filler openings for the 6 different variations of the M-1942 MOD. As you can see the Coleman (C-A) pump tube is roughly the same size as the 1944 Preway (PW) pump tube/filler opening. It barely fits and I can see where some dried fuel residue or slightly different diameter pump could prevent the C-A pump from being used in the PW stove. So, be cautious when swapping parts.

I replaced the main On/Off valve graphite packing as it was also hard and they are relatively inexpensive and easy to replace, so why not change it now?
I reassembled the valve and installed it in the tank (see Assembly Note below before installation). Then I gave it a pressure check to see if fuel leaked anywhere and it did. I do this by installing the valve assembly without the burner bowl and pot support, pressurize the tank, press my finger over the vaporizer and then open the valve. It appears that the compression ring (the silver disk) was not mating properly to the brass valve body. I tightened it plenty, but it just wouldn’t seal. I spent a lot of time looking for solutions and because I have two stoves was able to swap parts. If appears to be the mating surface of the valve body itself. The valve bodies do not have replacement parts available so I can’t just swap this part out with a new one. Meanwhile, I found that a little Permatex #2 will seal it for now (Note: since this time, I’ve purchased additional stoves, swapped parts between them and both sealed without needing any sealer 19MAR2016).
One question I’ve been asked is whether or not a sealer can be used on the spirit cup-to-valve body threads. None of my stoves use sealer when fitted properly and I’m not sure how well the sealer will perform under heat, pressure and liquid fuel. The seal should be made on two metal-to-metal mating surfaces. The three parts involved are the 1) vaporizer, 2) the steel disk and 3) the valve body. I would not recommend using any sealer on these parts. The beveled edge of the steel disk should seal to the valve body. If it doesn’t, look for damage along the edge of the steel disk. The steel disk is a relatively simple part and I’ve turned some of these on my metal lathe for spares. The vaporizer should seal to the steel disk. Sometimes you can see the wear ring in the vaporizer from tightening the nut/spirit cup which compresses the parts together. If this doesn’t seal, examine the vaporizer for wear where it would contact the steel disk. Additionally, look to see if the vaporizer bottoms out on the steel disk. It could mean that the groove in the vaporizer is too worn or the vaporize might not fit this stove. See my blog post on M-1942 vaporizers for some examples of the vaporizers for this stove and problems you might encounter. Regardless, getting the vaporizer to seat in the exact same spot could be difficult. (Paragraph added, 23DEC19)
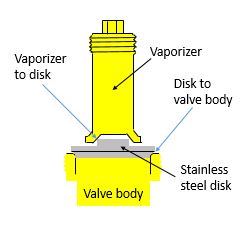
Valve body to vaporizer mating surfaces

M-1942-MOD valve assembly fully disassembled

Installing valve stem, with bushings and packing (see note before doing this)
Assembly Note: If you’ve removed the entire valve assembly, like I’ve done here, do not install the packing and valve stem/bushings before you install it in the stove. Here’s what to do: 1) install the valve stem/packing nut on the valve assembly and install the valve assembly using a deep-well socket and extension. The nut will help prevent damaging the threads and prevent bending the valve stem opening. I use Aviation Form-A-Gasket Sealant liquid (Item# 765-1210) on the tank threads as it was recommended by a Coleman repairman. Recall that proper clocking positions the valve stem opposite of the fuel fill opening. See photos later in this blog post if you’re not sure. And, remember to position the mounting post for the wrench on the pot-support/windscreen/frame above the main valve stem.When satisfied with the positioning, remove the nut. 2) place the small bushing on the valve stem with the beveled inside edge towards the wire which wraps around the valve stem. 3) install the packing, 4) install the large bushing, 5) insert into valve body, 6) thread the valve stem all the way closed, 6) install the valve stem/packing nut and tighten.

M-1942 MOD valve stem with wire for bushing stop
Installing the tip cleaner parts, assuming you removed them. Typically, I wouldn’t remove these, however this stove’s tip cleaner packing was gone (as in, missing!), so I needed to make one. Don’t remove it if it isn’t leaking. As far as I know, nobody has made them in 70 years! Well . . . except me, and I’ve made only a half-dozen and am still testing them.

Drop in the tip-cleaner mount

Install the tip-cleaner lever, packing and retainer-washer

Note the direction of the retaining washer
Here is what the full assembly looks like, though you cannot install it in the stove this way. I’m only showing it this way for clarity.

M-1942-MOD, Fully assembled valve assembly
The vaporizer/generator has a little screen which goes inside. These are almost always loaded with carbon and can be difficult to remove. I found a few places where I can get replacement screens and installed a new one. The tip cleaner needle goes through the middle of the screen so you need to be careful not to snag it when installing the vaporizer.

The Vaporizer with New Brass Screen Installed

M-1942-MOD with Tip Cleaner Installed
I finished re-assembling the stove and filled it with fuel, then gave it one more leak test. All good. I re-installed the burner bowl, pumped it up and opened the fuel valve long enough to fill the pre-heat cup. A side thought. I always thought that MSR invented the preheat cup as this is a common feature on the Whisperlite and other MSR stoves, but apparently it was invented during World War II or possibly earlier. It is present on this stove, some Coleman 520s, the American (AGM) M-1941, and the M-1950 stove (which was manufactured up into the 1980s, I believe). Anyway, I lit the pre-heat cup, watched it burn, checking for any flames where they don’t belong, and with everything going properly, opened the main valve and got a nice blue flame.

The M-1942-MOD with the Pre-heat Cup Lit

And Then . . . a Nice Blue Flame
The second stove works without any maintenance other than a tank cleaning, new fuel cap gasket and new seal in the NRV valve. Now, I’ve got two working M-1942-MOD stoves and may just take one on a backpacking trip as these are very light little stoves. And, with that pre-heat cup, I’ll bet it lights-up nicely, high up, in the cool air of the mountains.
Location of instruction labels (added 27NOV2016) – It seems that the three manufacturers didn’t place the labels in the same place on the stove (see photo of stoves with original instruction labels).

Label locations are different; Aladdin (l), Coleman (m) and Prentiss Wabers (r)
Update for 19MAR2016: If you have questions about assembly or what something looks like which I’ve omitted, please add a comment. I’ve rebuilt 6 of these stoves (four PWs, one Coleman C-A and one Aladdin) to date and have lots of photos.
Update for 22JUL2019: To date, I’ve rebuilt 17 of these stoves and two M-1942 wheel stoves, and have even more photos. My sons love to use them for backpacking trips as these are all-weather stoves and work really well in the mountains and all temperatures so far. Check out my other posts on this stove and other stoves and lanterns and lamps and irons.
Thanks for visiting my blog.

Hi got a ?on m42 field stove, I got two myself and restored them both, but now I have gas going into the pump valve, is that supposed to be?
LikeLike
Sorry for the late reply, I was out of town.
No, definitely not. Did you also replace the check valve gasket (some people call this the pip)? You should never, or almost never, have fuel in there. It’ll vaporize and possibly ignite when the stove is operating. I had that problem on a stove as well. Might have been an M1950 but it is the same design. What you should do is pump the stove, and after 20 or 30 pumps, see if the pump tries to back out on its own due to tank pressure. It shouldn’t do this. Three things can be the problem if this happens, either the spring on the check valve is too weak, or else the gasket material is old and won’t seal. And, third, if it’s a new gasket and the spring is okay, the gasket isn’t sealing properly. Sometimes I think some of the replacement pip gaskets are too firm and don’t seat well against the pump tube. Let me know what you find out. – Steve
LikeLike
Can you use the 1950 spring on the m1942 stove?
LikeLike
The M-1950 stove uses a conical spring, so it may not work correctly when using the straight-sided brass cup from an M-1942. However, if you have the M-1950 spring and the M-1950 brass cup with the right size seal (a.k.a. pip), that will work just fine. I have one or two M-1942 stoves which use the M-1950 spring/cup/seal.
LikeLike
I too have this problem. I replaced the pip with a new one but I am still having fuel leak into pump valve and the pump still is backing out for 20 pumps.
The original pip seemed very compressed, (and slightly deformed from the spring pressure?) so I believe it should be a fairly strong spring but I don’t know if it’s possible to go over board. My next step is to buy a new spring but I don’t know if there is a specific size I need or if it’s just my guess work. Sklcolorado, do you have any suggestions? Thank you
LikeLike
Hi Josh, I will try to contact you via email. I’d like to see a photo of the parts.
LikeLike
I only have the 1950 spring that coming in the mail I don’t have m42 spring ore the cup for the 1950 parts 😬
LikeLike
I’ll send you an email.
LikeLike
Hello. Do you have any photos of the valve stem assembly with the packing and related parts?
Thankyou, Crechio
LikeLike
I happen to have a stove completely disassembled so, I’ll go take a few photos and then post them. – Steve
LikeLike
Hi Crechio, I updated this post to add more information and photo. Please let me know if it’s what you’re looking for. – Steve
LikeLike
[…] opted to bring one of the restored M1942 stoves , and it worked great the whole trip. He used it for one dinner, and two breakfasts, including […]
LikeLike
[…] touchy. The flat, squared mating surface in the valves are reminiscent of the fittings on the M1942 stove’s vaporizer/ stainless steel disk. Those can be difficult to reinstall correctly as well because, you really need to get the the two […]
LikeLike
Nice looking stoves. I have a beater M1950 that works great and I’m hoping to find a 1942 at a flea market or garage sale.
LikeLike
They really are. Except for the seals and knobs they’re stainless steel and brass, so they hold up really well. The last one I bought, I found in an antique mall for $18. It was still full of unleaded gasoline, the vaporizer was clogged and it needed new seals. After, cleaning it up, it’s the one I use regularly. Keep your eyes open and I’ll bet you find one.
LikeLike
Hello from Spain.
Some weeks ago I bouht a M1942 Stove in Ebay. When arrived to my address I could see that the burner bowl It was very run down,and my question is , where I can find a new burner bowl?
I asked in oldcolemanparts.com but they haven’t.
Thaks in advance
Sebastian
LikeLike
How bad is it? Send me a photo if possible. Since they are made of stainless steel and brass they are typically salvageable. I can think of two other solutions to your problem. The burner bowl used in the M1942 stove has three square holes in it so the pot support arms can pass through the burner bowl and fold up. After WWII, there were surplus items and/or old tooling available and on the M1950 stove, and only for Coleman, and only for the year 1951, surplus or old tooling burner bowls were used. I have two Coleman 1951, M1950 stoves and they both have the M1942 burner bowl. So, you could look around on ebay for a cheap stove just for the purpose of getting the correct burner bowl, then buy a standard round hole M1950 burner bowl from Old Coleman Parts and re-sell the 1951 M1950 stove. The second possibility is to buy the round hole M1950 burner bowl from Old Coleman Parts and cut the holes to the square shape to allow the pot support arms to fold away. Except for the square versus round holes, the two look the same. And the vaporizers used on M1950, M1942 and WWII 520 stoves are all the same so the threads will match. Let me know about the old one.
LikeLike
Hi, I am trying to sort out a new vaporizer for an M1942 bought recently. Depending on where I look, forum sites disagree as to whether the Coleman 520 is compatible or not. As I can source a 520 but cannot find a M1942 version, can you just confirm that the former will fit? regards
LikeLike
Hi Jan, Thanks for the question. In response to your question, I wrote a new blog post here: https://sklcolorado.wordpress.com/2016/11/14/m1942-520m1941-and-m1950-vaporizers/ Take a look and see what you think. I can see why there is confusion.
LikeLike
[…] Feel free to check out some of my other posts about old camp stoves by scrolling up to the top of the page and selecting the Stoves and Lanterns Topic, or specific posts about the M-1942 stove, like Vaporizers, Cold-weather Single-burner Stoves, and Prentiss Wabers M1942 Stove Rebuild. […]
LikeLike
[…] or specific posts about the M-1942 stove, like Vaporizers, Cold-weather Single Burner Stoves, Prentiss Wabers M-1942 Stove Rebuild and The M-1942 Mountain […]
LikeLike
Where do go to Get a tip cleaner Packing For A M1942 mod Stove
LikeLike
Hi Lawrence – How can I reach you? Since I approve all messages, if you send me your email I can keep your info from being posted on my blog. – Steve
LikeLike
Steve, I really appreciate the time you’ve taken to document refurbishing these stoves. I’ve learned a lot, but do have a fairly fundamental question. I have a m1942 PW 1945, understand the pump mechanism well, and have gotten the burner bowl off, but unless my stove is just put together really tightly I can’t figure out how to get the main valve assemble separated from the tank. Appears to be a 3/4″ nit but it doesn’t budge, and the windscreen doesn’t leave you much room to work…help!
LikeLike
Hi Mike, For some reason I stopped getting email notices when people message me, so I apologize for not getting back to you sooner. I’ll try your nasa email. Steve
LikeLike
Hello, i have some Alladin stoves and i need some parts. Needles gaskets springs. Can you tell me where i can buy them? Thanks Libor
LikeLike
Which gaskets? For the M-1942 MOD stove, if you are referring to the fuel cap/pump tube gasket and the air check gasket check out Old Coleman Parts. Which springs are you looking for?
LikeLike
Hello, thanks for answer, ill check old coleman parts.
looking for springs that closing getting fuel to air pump. Didnt find anywhere to buy original. Do i have to look around for non-original spring that works?
Only spring i find is https://www.oldcolemanparts.com/product.php?productid=3636&cat=&page=1 but i have different number of screw-thread then mine only one works.
https://scontent.fprg2-1.fna.fbcdn.net/v/t1.15752-9/34537598_2082709808425875_4000106680049205248_n.jpg?_nc_cat=0&oh=3bd1c3781865087927624b68ddcca326&oe=5BB1B7A7
Thanks for help Libor
LikeLike
The original size and shape spring for the air-check, also called check valve, will not likely be found. You will need to experiment to find a suitable replacement. Some people have had success using springs from ink pens. If you look at my post on pumps you will see that the M-1950 spring and cup will fit and work correctly. You could acquire one of those until you locate an original-style spring.
LikeLike
Hi frm Germany. is there any way to clean the vaporizer nozzle ? – I believe that the tip cleaner needle sticks in it. thks Chris
LikeLike
Typically, I clean the tip by soaking it in denatured alcohol or in an ultrasonic cleaner, then, using a piece of an old vaporizer screen I roll it up to fit inside the vaporizer tip (not the wire hole) and twist it around to get any carbon removed. Then I use the current needle or an old needle and cycle it through the tip until it moves freely. You need to be careful not to bend the wire of course. What is the issue? If the stove doesn’t seem to have much power then the wire hole may need to be cleaned as you suggest. If the stove stops working shortly after start-up, and everything else is in good shape (pressure, etc.), then you may have a tip cleaner with a wire which doesn’t retract completely. If interested, I can contact you via email and you can send me some photos.
LikeLike
thks, pressure is good, fuel comes thru the nozzle but only a very short time, then the nozzle is blocked again. – Yes, would be great if you would ctc me by e-mail. btw the stove is the Prentiss Waber M-1942-MOD PW-1-45
LikeLike
Thank you for the information and the pictures , after being burned 2x, due to leaking fuel and falling gaskets, I learned that white gas burns colorless on your hand till you realize it’s on fire, I’ll start over, and get this girl going. It’s personal now. But I do LOVE this little jem.
LikeLike
I always wear a leather glove for the first lighting, just in case. Where is it leaking?
LikeLike
Hi can you advise on how to remove the main burner assembly from the tank body. Thanks ian
LikeLike
What I do to remove the burner assembly from the tank is, 1) remove the burner bowl (make sure the pot support arms are up), then vaporizer by removing the spirit cup/nut. 2) remove the tip cleaner (the piece with the wire for the vaporizer tip) it’s threaded into the valve assembly. 3) Loosen the lock ring at the base of the valve body which holds the windscreen/pot support tight, and finally 4) using a deep-well socket with extension, place it over the valve stem nut and slide it on as far as it will go, have someone hold the tank and remove the valve body. I typically remove the valve stem and place the nut back on there for strength and reduce the chance for damaging the threads. Let me know if you have other questions or if a photo will make it more clear. You can also check out my M1950 stove post and the 275 lantern post for the similar technique.
LikeLike
Thanks for that. The stove is up and running and no leaks. It windy buttried outside in lee ofwall. Seems to be firing up ok after pre burn but kept going out . Poss due to wind or any suggestions?
LikeLike
What are you trying between the time it goes out and re-lighting? Try opening the fuel cap to see if there is still pressure, because sometimes the pump is not pumping as strong as you might expect. Second, try cycling the tip-cleaner lever to see if some particles are getting stuck in the vaporizer tip.
LikeLiked by 1 person
Hello Steve,
Thanks for the good info about this old stoves.
I have got one which I am trying to restore.
The problems I have is:
-how can I disassemble the valve (with the legs) without breaking anything. (a photos would help alot.
-the cleaning needle is stuck how can I take it out to replace it.
Thanks again Steve.
Keep up the good work.
LikeLike
Hi akaaay123, concerning your first question, I’m not sure which part of the stove you want to disassemble. Is it removing the valve from the fount or removing parts from the valve? Concerning the cleaning needle, solvent on the threads might work and if it does not then heat would be a good option, that is, use a propane or butane torch to heat the tip cleaner and then use something like pliers to grip and rotate it. However, it would be safer to remove the valve from the fount because residual fuel in the fount could be ignited. If it is impractical to remove the valve from the fount, be sure to rinse the fount and valve assembly with denatured alcohol and then dry completely. To remove the valve I use a strap wrench around the fount. I’ll look through my photos to see if I have one showing this.
LikeLiked by 1 person
Hello Steve,
Thank you for your quick reply.
What I meant was removing the valve from the fount. It is very hard to put it on a vice with the frame attached, and there is no nut to grab the valve assembly to unscrew it from the tank , any suggestions?
Thanks again Steve and god bless.
LikeLike
Oh, I see. Sure I’ll add some instructions and a photo to the rebuild post in a few minutes.
LikeLiked by 1 person
Hello again Steve,
Thank you very much, you are a legend.
I followed your instructions but I couldn’t find a (deep-well mechanics socket), so I carefully used a larg adjustable wrench to hold the nut then turned the tank.
IT WORKED, I got it loose after a week of trying 🙂 .
credit for that is all yours Steve.
Thank you very much bro.
Keep up the good work.
God bless you
LikeLike
Hi Steve, I’m in the uk and have acquired a PW 1942 MOD stove. All parts appear to work apart from the valve will not shut off…..I have had the stem out, and refitted but the pointed tip seems to have a groove worn into it. I thought it would still work but appears not. Is this the issue? Can I ask please also for confirmation that the ‘wire ‘ you refer to above that goes around the stem goes loosely in the little slot before the thread starts? Your laid out pic of the stem, which is most useful doesn’t seem to include the ‘wire’? many thanks
Best John
LikeLike
Hi John, Photo added of valve stem. Take a look and see if your wire is in the correct location. Typically, if the valve stem is worn it’s been grooved by tightening. If you want I can send you an email and then you can send me a photo of the stem.
LikeLike
Thank you that’s brilliant. I can see I do have the stem set up correctly but it will just not shut off. I also now think the shoulder of the point is looking good. Would be great to exchange picture though, thank you.
johnthornton@sky.com
LikeLike
Hi Steve,
This entry and the related ones are really great and inspiring!
I stumbled onto this very stove and canister case in a box of tools I bought. From your blog posts it looks about 95% complete; I’m missing the spare parts clip and contents BUT I did have a needle, vaporizer, 2 rubber NRV plugs, a cap gasket, and I think a graphite packing ring inside the pump. The graphite pretty much fell apart as I was taking it out and the cap gasket probably would if I tried to open it up/use it.
Questions:
1) If the spare parts were in pump, would there still be the spare parts clip & contents?
2) Do you have a step-by-step take apart guide/reassemble/video posted anywhere?
3) Where is the best place to get all my “soft” parts (gaskets, graphite rings, leather pump plunger. etc), operation sticker, and any missing metal parts? I’ve seen a couple sites mentioned and I’m quite good with buying a kit for simplicity & spares. I’m not fretting any parts swapping but packing graphite seems like an invitation to annoyance (if pre-made rings are available). And I haven’t seen any site that had the sticker.
4) How can I tell if the spring behind the NRV plug is worn out? I have no point of reference for this.
Thank you so much for sharing your knowledge!
Curious
LikeLike
From what I’ve heard many soldiers in the field would simply cast aside the spare parts clip if they replaced the vaporizer. I do not have any stove restoration videos. I’ve thought about it, but so far, no. Try OldColemanParts.com for a soft parts kit and maybe an instruction label, or I think there is a place called the Fettle Box which may also have it, though I’ve never purchased from them. Contact Mike at Old Coleman Parts if he doesn’t have what you need shown on the website. He gets parts periodically. Let me know what he doesn’t have and I’ll see if I have it myself. I haven’t seen the spring worn out except for one that someone cut down for some reason. A new gasket usually fixes it up. Are you saying that you need a graphite packing? If so, which one (there are two).
LikeLiked by 1 person
I just spent a little time cleaning out the bore, spring, and brass peg for the NRV (mine is the style in the top of your NRV pic with the hex shaped brass peg) and it actually moves now that there’s no gunk inside to bog it up. 🙂
I’m assuming both graphite packings are shot just based on age but I haven’t actually tried to light it up for testing (just being cautious at this point) nor taken any of the valve body apart to examine the innards.
The plunger leather is in surprisingly good shape for its age. It’s possible that the stove would be functional right now, given some fuel. But all things considered I’d rather replace the soft parts anyway.
Is it me or are there really no good angles for using the wrench on the outside nuts? All of them seem clocked just slightly out of position for getting the wrench on them. The square nut for attaching the wrench IS directly above the fuel valve.
LikeLike
A question on the NRV. The one in mine is the one shown in the top of your NRV pic (rubber plug towards the pump, hex-shaped brass peg with a recessed area on one end, spring). When I took it out of the pump, the rubber plug was missing (still had 2 inside the plunger body though) and the spring was fitted into the recess area of the brass peg. Is that where the spring is supposed to be or is the recess area for the rubber plug; IE, is the brass peg flipped around backwards and the spring should press against the flat end of the brass peg?
Thanks!
LikeLike
There is a recessed area in both ends of the hex-shaped fitting which holds the spring on one end and a 4mm rubber gasket/pip in the other. It’s possible that the rubber part and hex-shaped part is so old, dirty, etc. that it looks like part of the brass, assuming that hex-shaped part hasn’t been altered. The rubber gasket can get rock hard, so take another closer look and see if this is the case. I’ve had to dig out lots of these gaskets.
LikeLike
Got to poke with it over the weekend and did indeed find the brass peg in the NRV was recessed on both sides 🙂
So far, I’ve been using various common chemical solvents to clean it before doing a full take apart. I started with a fairly mild parts cleaner in a buddy’s parts tank and it didn’t do much but it DID completely dissolve the laqoured fuel inside the large piece of the storage canister that was also pretty thick on the bottom of the burner (the leg hinges were quite sticky and stiff before that). After that, Fast Orange did a great job on the storage canister, good on the external soot on the pot support, support “arms”, & windscreen, and (when combined with a QTip & drill) a fantastic job cleaning out the interior of the brass nut for the NRV; SHINY! I tried break cleaner for getting off more of the exterior build up with zero progress. Yellow cap Easy Off did a good job; possibly too good. I was careful not to get any of the Fast Orange on the valve body because I didn’t want grit getting into any passages or threads so the large nut over the fuel valve and the preheat cup were still completely black with soot & build up. After the Easy Off and a little rubbing with fingers, the nut over the valve body was silver-grey. the preheat cup was almost completely clean, and the nut for the cleaning arm looked to be either losing some brass or perhaps was showing some (heat?) discoloration. I think at this point any further cleaning will require complete take part to gain access & probably buffing.
I resoaked the leather of the pump and it may actually still work (going to order a new one and other “soft” parts though). I THINK if I replaced the washer for the pump body (it’s clearly rotted and cracked) it MIGHT actually work now.
So after all that, my questions are:
1) Is the nut that’s on top of the valve body some base metal that was electroplated with brass that I’ve foolishly stripped off or is it stainless steel that I’ve simply cleaned?
2) Kinda the same question for the cleaning lever nut…Am I getting close to stripping off an electroplate brass coating or is it actually needing to be buffed to get it completely clean?
3A) How level does the rubber for the NRV “pip” need to be in order to work properly?
3B) Should the pip it be flush with the brass peg or should about half of it protrude above the brass? BTW, its a pain getting new pips to go in!
And yes, this is the first time I’ve rebuilt a stove or lantern 😛
The “If this thing could talk…the stories it might tell.” factor makes me want to get it functional and cleaned though probably not COMPLETELY polished.
LikeLike
The nut on top of the valve body? Are you talking about the one with the spirit cup attached? If so, the nut itself is stainless steel and the preheat cup is solid brass. Clean away! It would be difficult to damage by cleaning. The tip cleaning lever is stainless steel but the tip cleaner packing nut and retainer is solid brass. The M-1942 MOD, assuming it is a later 1944 model or 1945 has no plated parts that I can think of . . . well, maybe the pump shaft and grip was originally plated and the pump cap. Maybe the feet? Anything on the valve is solid brass or stainless steel. The pip typically stands a little proud of the cup that holds it. The top should sit relatively flat and be very smooth. 4mm diameter is the right size for the pip. Don’t use pips from a M-1950 stove as those are 4.5mm and won’t fit correctly (see this post, https://sklcolorado.wordpress.com/2015/12/15/m1942-and-m1950-nrv/ ). If the 4mm pip is cut well it should go in easy. When it was new it was probably shiny or at least clean. Either way is good by me. This is a good stove to rebuild if you’re new because it is relatively simple (no F/A tubes, etc). Fuel cap gasket and new pip are the minimum and then oil the leather pump cup. I have several M-1942 blog posts and I hope you saw the one about Minimal Effort to Blue Flame (https://sklcolorado.wordpress.com/2017/04/16/m-1942-mod-minimal-effort-to-blue-flame/ ).
LikeLike
I am Japanese, but I love American-made military gas stoves and lanterns.
Especially M1942 is my favorite. I found the homepage while checking unknown things during maintenance. It was very useful with detailed contents. Thank you. I’m using a translator, so I’m sorry.
LikeLike
I am happy that you find the blog useful. You message was clear. Best Regards, Steve
LikeLike
Hi Steve,
Two questions:
1) Do you have any source for a new tip cleaner on an Aladdin MOD stove I just purchased one and the fine wire is missing.
2) Do you have a source for a new vaporizer screen or recommendations on how to remove and clean a very gunked-up one? I’ve been soaking it in carb cleaner but no luck so far.
cheers,
Brian
LikeLike
Hi Brian, The tip cleaner on the M-1942 is a similar type used on the Coleman and AGM versions of the 520 military stove of the same era. Have you confirmed that there isn’t one in the pump tube? You can look for one those spare parts tubes for sale on ebay, which would have vaporizer screens, and spare tip cleaners. I haven’t looked at using a 520 tip cleaner in a M-1942 for quite a while, so I can’t say 100% sure. Concerning removal of the old one, most of the time, after soaking, I remove the vaporizer tip and insert a finishing nail into the vaporizer, (blunt end first into the vaporizer) and hit the sharp end with a hammer to see if I can break it free. You might give that a try.
LikeLike
Hi Steve,
Thanks for getting back to me. The spare parts box on my unit had the graphite packing, but the other items were already used and messed-up. I was being pretty gentle with the screen, and just tried pushing it with the blunt end of a ballpoint ink tube. I had no idea how robust they were. I’ll try the finish nail idea.
A few additional questions:
1) Have you tried using oven or grill cleaner on these or other particularly gunned up parts?
2) My pump was missing the spring, but for the moment a modified ballpoint spring seems to be getting the job done. Any ideas on a source for replacement springs (I looked on the old coleman website, but came up empty). Just picked-up a Coleman 520 spares kit on Ebay, so I’ll see what if anything in it will work.
3) Have you ever found a need to use any sealant or gasket materials for things other than the pipe threads from the valve to the tank? I was particularly curious about the seal at the base of the vaporizer.
Your blog an information have been great. Thanks for putting all of this together!
regards,
Brian
LikeLike
Brian, I just updated this post with a bit of info and a sketch of the vaporizer-to-steel disk-to-valve body seals. Have a look at that. The short answer is no, I wouldn’t recommend using a sealer in that location. I’ve read of people using a pen spring, but I’ve never had success using one. I did make a brass spring last winter and I think it works okay. I have not found anyone making those springs. Another option is using the M-1950 style spring/cup check valve. If you can’t find one, let me know. I have heard of people using oven cleaner, but have never tried it myself. BTW – you mentioned that the parts clip had used parts, but did you un-thread the handle from the pump tube and check for parts in there?
LikeLike
Hi Steve,
Thanks for the tip on looking for spares inside the pump handle. There was a brand new generator with cleaner tip and several pips in there. I had no idea.
Happy New Year,
Brian
LikeLike
Brian,
The pips will likely be dried out, but having a new generator in the pump tube is fantastic! Happy New Year!
LikeLike
Hi guys,
tommy here from the uk, i have picked up a m1942 stove here in the uk that is ill repair, being a stoveaholic😀 i bought it dirt cheap at a army surplus shop, given its bad condition its all there apart from the bell top burner that screws onto the vaporiser… Looks like it has been snapped off some how, im currently cleaning all the parts and soaking them in lemon juice as i type… i used this blog to disassemble it:-)
Question is, where can i buy a new burner bell top for this stove?
LikeLike
Hi Tommy, The M-1942 burner bell is the same as the M-1950 burner bell (a.k.a. burner bowl), except that the M-1942 has square holes whereas the post-1951 M-1950 has round holes. The square holes are to allow the pot support arms to pass through the burner for storage. So, you could buy the M-1950 burner bell from someplace like Old Coleman Parts, square-up the holes with a file, and then it should be like the original. Option #2 would be to locate and purchase a 1951 Coleman M-1950 stove which originally used the burner bowl with the square holes and then swap it to your M-1942 stove. Option #3 would be to find someone who has an extra burner bell with the square holes and sell it to you. Many collectors of M-1942 and M-1950 stoves have a couple of these laying around, I think. I’m curious about the current condition of this stove, so if you have a way to post a photo, please do. Also, be sure to replace the cap gasket and check valve gasket (pip) first thing. – Steve
LikeLike
Hi Steve, I have been admiring the M-1942 stove for awhile and am preparing to buy one. I have read your entire blog on this stove. Rebuild seems pretty straight forward except for the graphite packing on the cleaning lever which seems to be unavailable. Did you make a packing? I am thinking one could be machined out of a graphite rod. What was your solution? Also your stoves look beautifully clean. How did you clean them up? Just alcohol and fuel, did you use an ultrasonic cleaner, or a buffer or fine steel wool? Thanks for any advice.
LikeLike
I considered buying graphite sheet and machining the tip cleaner packing, but it was difficult to source the correct thickness. I bought some graphite rod and tried to machine it on a lathe, but really it is just too hard. It doesn’t seem to compress without breaking apart. Additionally, graphite dust is not so good for power tools, so I was a bit concerned about ruining equipment. I made my own packings using pure graphite flakes and a couple other ingredients and some tooling I made to press them. I make them from time to time and offer them to people, but I haven’t made any in a while. Concerning the valve stem packing, this is a pretty standard item you can buy at places like Old Coleman Parts. I believe it’s called the large graphite packing. It’s a standard size which is used on most Coleman lanterns. For cleaning, I’ve used a brass brush, #0000 steel wool and an ultrasonic cleaner. The brass brush gets a lot of the grunge off and between the threads, and then I’ll throw it in the ultrasonic cleaner. If I’m still not happy, I’ll use the steel wool. The steel wool is pretty messy and gives it a polished look which I don’t always want. To clean up my bench I wrap a paper towel or old piece of a cotton shirt around a magnet and pick up the steel wool dust. Then peel off the towel over a trash can and throw the towel away. Let me know what you get and if you have any questions.
LikeLike
Hi Steve, Your clean up method is a good idea. I have used a similar idea and put the magnet in a ziplock bag but I like your idea of just wrapping it in a paper towel. Simple and effective.
I just bought myself a 1945 PW M-1942 stove. Probably paid a little too much but I got all geared up after reading your blog and don’t have much patience for auctions. In the pictures, it appears complete, undented, with the wrench, and vaporizer holder with a used vaporizer, and it even has an unburned but cracked wooden knob on the tip cleaner. Maybe it even works. I am a user more than a collector and plan to use this stove for car camping.
Do you know what wood was used for the knob on the tip cleaner? not that important but i will be correct if I can.
What does the stove community think about M-1942 stoves that are polished? One of the main features of the M-1942 stove is that it is SS and polishing would make it look nice and accentuate this unique feature.
On the tip cleaner packing, what did you use as a binder? According to Wikipedia: graphite is made from petroleum coke mixed with coal tar pitch extruded and shaped, baked to carbonize the binder (pitch), and finally graphitized by heating it to temperatures approaching 3000 °C, at which the carbon atoms arrange into graphite. At this point I don’t know if i will be needing this packing, so I will hold off on buying a kilm 😉 Have you measured how hot this piece of the stove gets? knowing that will help in the selection of alternative packing materials.
As an aside, I have been thinking about your leaking tank problem on one of your stoves. Those stoves are probably silver soldered which has a low melting temperature. I think you should be able to heat up the tank with a rosebud torch to separate the pieces.
LikeLike
As you can see from a bunch of my backpacking and camping posts, I prefer to use the stoves, but somehow I began collecting them! I was never sure what wood was used for the tip-cleaner knob. I took it to a wood store and tried to compare the grain. I made replacements from walnut. It seems like it might be a lighter wood and then stained, but the walnut looks good with a bit of clear sealer on it. Are you concerned about reselling the stove? If not, then buff it out and enjoy it! If you are thinking about resale, then only polish it up and use it. The founts don’t get all that shiny unless you really work on the finish, though the Coleman’s seem to take a shine better than the other two. For the brass parts, make them shine. They’ll get dull again in a year or two. You’ll see what I mean when you get it. I don’t have petroleum coke or coal tar pitch, but maybe the packings use these as binders, too? I use pure graphite flakes instead of trying to make the graphite. You can buy graphite by the pound pretty easily. I don’t like to post exactly how I do it because I don’t want someone trying it and then starting something on fire and then blame me. If you want I can email you and discuss offline. I think I did measure the temps at one time. Pretty sure it was less than 250F (actually 180F sticks in my head, not sure though). These are silver-soldered and while I can low-temp solder all day long on anything from copper pipe to 0201 size resistors, my ability to braze well is lacking. I’m working on it, though!
LikeLike
Hello there:
I heard that many M-1942 Field Stove check valve screws cannot be opened. Would you like to tell me what a check valve is?
Thank you
LikeLike
The M-1942 stove uses a spring/cup-type check valve (also called Non-Return Valve or NRV), I have a post which describes the NRV or check valve here: https://sklcolorado.wordpress.com/2015/12/15/m1942-and-m1950-nrv/ Hopefully, the photos and explanation will answer your questions and as you’ll see the check valve gasket can be replaced. If, after reading that post, you still have questions, please let me know.
LikeLike
Thank you
LikeLike
Hello,
I have one of these stoves. I believe it’s an M1942 “MOD”. I don’t know really what I’m talking about, but that’s what it says on the windscreen, and I’ve seen the “MOD” ref several times throughout this blog. I’d like to get the stove functioning, and use it on a motorcycle trip next year. It appears to be in very good shape. I disassembled it, following the procedures described here, up to the point where the valve stem and tip cleaner are removed.
I unscrew the valve step as far as possible, but it never reaches a point where it continues to turn, without backing out of the valve body. Instead, it tightens up and doesn’t turn any farther. I’ve tried turning it harder, thinking it would push out the brass washer, but I’ve not had luck, and don’t want to break it.
The tip cleaner also will not come out. It seems the brass washer is stuck tight in the valve body.
Any thoughts?
Thank you,
Dave Shane
LikeLike
I’ll need to see some photos to be sure I understand the state of the stove. I’ll send you an email.
LikeLike
Hello,
Thank you very much for this detailed review and disassembly guide. I just purchased a Coleman m1942 off of ebay and it looks to be in fine working condition. The seller said they used it about a year ago, then drained the fuel and have not used it sense.
Would it be possible to make a disassembly video on YouTube? Again, your post is well documented but I’m having a hard time visualizing some of the disassembly steps.
Thank you very much.
Regards,
Josh
LikeLike
Hi Josh, Since you’re new to this stove, and the seller says it’s in working condition, you might try using it for some time before tearing it down. Have you looked at my post M-1942 MOD – Minimal Effort to Blue Flame? That would be a good place to begin. As I mention in that post, there really isn’t much inside the fount to service, unless the fuel tube is clogged, so I don’t recommend doing it unless it’s necessary. If you have any specific questions after reading that post, please ask.
I have thought about making videos for the stoves and lanterns I’ve refurbished, but I only have a GoPro for recording which I’ve used on my river trips and such. I have those videos posted on my YouTube Channel. It has a wide field of view and wouldn’t be great for close up video like a stove tear-down, IMO. Maybe one day, but for now, I don’t have the right camera. I might look into it, but it won’t be anytime soon. Sorry.
LikeLike
Sklcolorado,
Thank you for the fast reply! I have not looked at post but I will start there. I understand it very much.
Josh
LikeLike
Hi, Steve, really enjoyed your blog. Have you encountered any of these stoves where the fuel cap gasket has fused the filler tube to the fill spout? Mine is locked on tight. Hard to get leverage on it without boogering something. My plan is to slowly hit it with heat the put the cap ring on about halfway and pull/press upwards.
LikeLike
Is the fuel tank empty? I’m not sure that I’d want to apply a flame to something with fuel in it hoping the fitting comes loose. You might try a hair drier or heat gun. Additionally, since the cap should unscrew completely from the pump tube you could turn it over and use some WD-40 or Deep Creep, etc. at the pump tube where the gasket meets the fuel filler opening. Another thing to try would be to remove the pump as I mentioned and insert a large rubber stopper and give it a twist. Let me know how it goes.
LikeLike
Thanks, Steve. It finally came loose last night.
No fuel in it; not even old fuel shaking around. Odd, because this thing has definitely been fired.
I rotated between applying small amounts of heat, tapping against the lip with screwdriver, and the stopper method. Never trying too hard after learning my lesson about force with a 523 spun bung.
Then I remembered; hey, this thing is SS and brass! So I filled a small bucket of water, dunked it and filled the pump tube, then hit the top rim pretty good with propane. After the third time it just gave with no force.
Now on to removing the valve. That has already been done previously as the clocking is all wrong.
LikeLike
The nut is stuck on the spirit cup and I can’t get it to budge. Any ideas? Thanks
LikeLike
What do you mean exactly? Do you mean that you can’t get it loosened from the valve body? If that’s the case, I would first clean out the fount and dry it. Replace the fuel cap/pump. Then apply some heat to the nut using a butane or propane torch (this is why you want a dry fount). Replace the fuel cap. Try to loosen again. It may take a few attempts. If it still won’t come loose, then see if you can get a mechanics 3/4″ wrench on it for a little more leverage. You do need to be careful as it is possible to break loose the fitting on the fount or something on the valve body. Use your best judgement since I can’t observe the stove firsthand. Is the stove currently working properly and you just want to clean it, or is the vaporizer clogged, or something else?
LikeLike
I got it. Right after I posted. It wouldn’t let me respond until my comment was approved. But yea the nut was just stuck. Let it a few days in oil and got it to break. Thanks for the right up. I’m refurbing a 1944 PW right now.
LikeLike
Oh, nice. The 1944 PW is the most rare of the Mod version. Hopefully, it’s up and running soon and without further issues.
LikeLiked by 1 person
Know where I can buy the wood tips for the cleaning lever? That’s all it’s missing and would like to complete it.
LikeLike